OTHER TYPES of SPRINGSThis section will tell you about other types of springs that can be made. Where it's possible for you to make them easily, I'll tell you how. Otherwise, your best bet is to have these types of springs made commercially.
Made from Round Wire
Buckling columns are also used as sensors that send an electrical signal when something gets close to it. You can make buckling columns very easily with a drill: just follow the procedure for making fine-wire extension springs. Nested compression springs: Sometimes, you'll need a compression spring that's stronger than any single spring can be. In that case, you can make nested compression springs - one spring inside the other - that will be a lot stronger than a single spring. Some automobile valve spring assemblies are actually nested springs: so are the suspension springs on railroad cars. You can make nested compression springs easily: just remember two things:
Conical springs: You may want to make a compression spring that's smaller at one end than the other. This is called a conical, or tapered, spring. You can make these just like any other compression spring: the only difference is the arbor, which must also be cone-shaped.
Use good, hard wood - ash, for instance - and remember: wood is a lot weaker than steel. Don't try to coil long springs on a wooden arbor, and don't try to make a conical spring with wire heavier than about .125". It can be done, but with heavier wire, the wire will start to cut a groove in the wood. More important, the arbor may snap, which would NOT be fun. The other thing to watch out for is that when you grind the ends of a conical spring, you have to hold the spring in your hands to get it ground square. Because the sides of the coil are sloped, using a grinding stage would not give you a square end. Variable-pitch springs: Sometimes you'll want a compression spring that starts out "soft" and after a certain load is placed on it, becomes stiffer. This is called a variable-pitch spring, and you can see springs like this in some motorcycle shock absorbers:
These are pretty tricky to make, but you can do it. Here's how:
The key is to have some way to remember TWO coil counts: one for the first section, and one for the second. Once you can do this, then you can change where you switch from one lead-screw speed to another and come out with the exact spring that you want. Snap-rings: Snap rings are easy. Just coil an extension spring with the right diameter and cut off single rings, one at a time, with wire cutters.
Making double torsion springs means making some pretty specialized tooling, and the best way to actually wind them is with a hand-winder. Here's how:
Then, check your dimensions and change the number of coils you lay down until you've got the right number.
Stress-relieve the coils and finish the ends like any other torsion spring. Note that because the two coils are mirror-images of each other, you'll probably need to make two setups to do any bending on the legs of the spring - one for the right-hand coil and one for the left-hand coil.
Wire forms: Wire forms are any shape made out of wire - not just a coil. There are a jillion different kinds of wire forms: here's a common one.
You can make wire forms easily with round-nose pliers, or with a bending jig.
Bedsprings: These are basically hourglass-shaped compression springs in which the ends wrap around themselves. They're made on special automatic machinery - I hope you don't need one bad enough to try making it yourself - they can probably be made by hand, but it would not be easy.
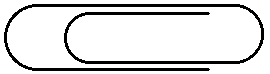
Limited-travel extension springs: Sometimes you'll want to make an extension spring that only extends so far and then stops. You'll see these sometimes on screen doors:
As you can see, they're basically compression springs with a little extra added hardware. Here's how to make them:
There you go! Braided wire springs: Howitzers and other military hardware use springs that have to handle sudden significant loads. Ordinary solid-wire springs would shatter under the stress of artillery recoil, so for these situations springs are made out of braided wire. I haven't seen any of these myself but I imagine that coiling such material would be similar to coiling solid wire. Very heavy wire: What's the heaviest wire that can be made into a spring? Well, coiling cold, the heaviest is about 5/8". Most spring shops won't coil 5/8" wire cold, though, because it's too dangerous. Springs made from larger material start as straight bars of steel with the ends tapered down. The bars are heated red-hot and then coiled on special machinery. I've seen 2-1/2" bars made into railroad suspension springs, and I've heard of 6" bars being made into compression springs that are used as shock absorbers for underground military command sites. If you need a spring made with wire thicker than .375", I'd recommend going to a spring shop and having them make your springs for you. With a big enough lathe and a thorough awareness of wire safety, you can coil up to .625", but frankly, most springmakers you talk to will think you're crazy. Very light wire: Common commercial coiling machines typically handle wire as fine as .010", but springs have been made with wire as fine as .002" using custom-made micro coilers. Winding extremely fine wire by hand is difficult because the wire tangles easily and cuts flesh even easier. Leave these to the pros, OK? Springs Made from Other MaterialsMany springs are made from material other than round wire. Again, if you can make some of these with simple setups, this section will tell you how. Square and flat wire: All types of coil springs can be made from either square or flat wire. Using these materials gives you a stronger spring than if you use round wire for the same design. You can use these materials to make your springs: the only change to your setup is the wire guide. Besides the wire guide that fits in the tool post of your lathe, hold the wire in a crescent wrench, in front of the tool post. As the wire coils onto the arbor, it'll try to 'roll' in a clockwise direction. To prevent this, keep a counterclockwise pressure on the wire with the crescent wrench. Then, the wire will lay down flat on the arbor. Tubular stock: You can also coil tubing into spring shapes for cooling coils and so forth. Tubular stock is very soft, though, compared with solid wire, so a couple of extra steps are needed:
Leaf springs: Leaf springs start out as bars of flat stock, which are then heated red-hot and formed, either by machine or by hand. If you need leaf springs, best bet is to go to a spring shop that specializes in making them. Belleville washers: These are just like regular washers - flat metal donuts - except that the inside of the washer is higher than the outside. Belleville washers are mounted in a pack and with a bunch of them together, make a very strong spring. Belleville washers are made by a stamping process that's best done in a spring shop. Clock springs: Some springs are made from wide, flat stock and coiled up like the shell of a snail. These are called clock springs, and the material they're made from is called 'blue clock', because the color of the steel is blue. Springs like this are found inside clocks, retractor reels, and other machinery. Take apart an old thermostat and you'll see that the sensor element is basically a clock spring. You can make them on a lathe, but you'll need special tooling that's not easy to make. Your best bet, again, is to go to a spring shop and get them made for you. On the other hand, you can always give it a shot. I've written up the basics here. Forward to Spring Shops. |

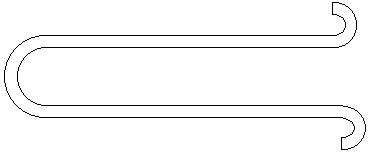
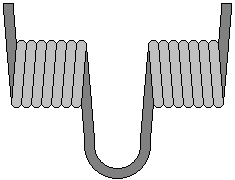
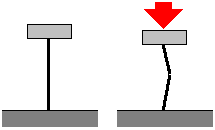 Buckling columns: Get the idea of a plain coil of very fine wire with no loops or hooks on the ends. Get the idea of one end of this coil being held in place, while the other end is approached by something. When the 'something' hits the other end of the coil, the coil will support it until the load passes a certain point, and the the coil will buckle. Here's what it looks like:
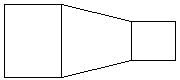 The best way to make a cone-shaped arbor for light wire is to turn one out of wood. Get your arbor diameters for both ends by using the steps in the section on
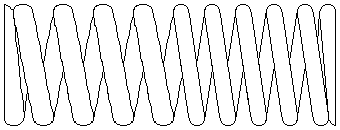
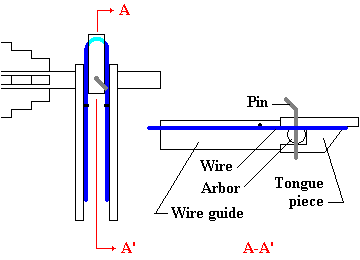
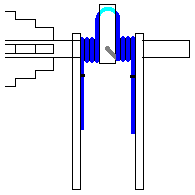
 Double torsion springs: You recall how
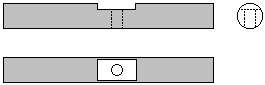
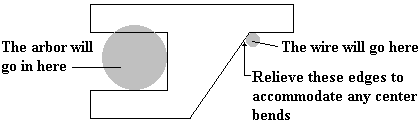
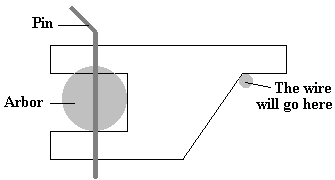
 Make a short pin that'll fit into the hole in your arbor. The pin should be an inch or so longer that the arbor is thick, and have a bend in one end. The other end should be slightly rounded, like this: