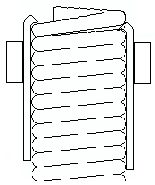
EXTENSION SPRINGSThis section will tell you how to make extension springs.
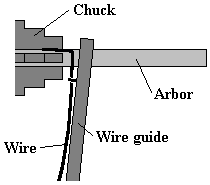
(For how to make extended hooks, see the torsion spring page.) Once you have your setup done, the first thing you should do is make sure you have enough wire. Wire LengthIf you're using light wire, or if you're making short extension springs with wire up to about .250", you really don't need to know how much wire you need for each spring - just be sure you have more than enough. You can figure a rough length by taking the length of the body of the spring, dividing by the wire size (which gives you an approximate count of the number of coils in the spring) and then multiplying that by 3.3. It'll probably come out too long, but that's okay - you can use your first couple of springs to set up for making your loops. If you want to make long extension springs out of wire over about .250" or if you want more than 50 of one design, I recommend that you go to a spring shop and have them make your springs for you. Coiling the First TrialNow let's make a spring.
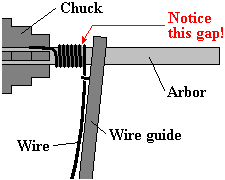
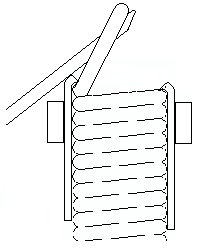
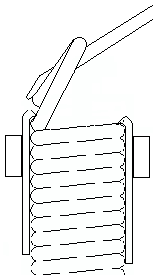
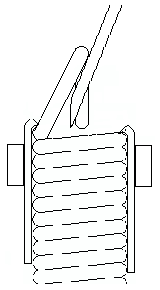
When you've finished this process, let the spring air-cool and check the diameter. If you did your setup properly, it should be just what you want. Then, look at the coils. They should all lie flat against each other, all the way out to the ends of the spring body. If you see gaps in the body of the spring, that means that you let the wire guide go too far to the right while you were coiling. Now, another word about initial tension. It may or may not be important whether the loops on the ends of your spring line up with each other or cross. If the spring is long enough, you can twist the loops so that they either align or cross, and the initial tension in the coils will hold them in that position. The information that follows, which will tell you how to make loops, assumes that the position of the loops IS important: if it's not, then just make the loops and let the spring's initial tension take care of how they align. Making LoopsThis section will tell you how to make one type of loop; a basic, no-frills type of loop that will do the trick for most springs. There are other types of loops that are stronger and prettier but to make them, you need tooling that is specially made for making this type of loop and nothing else. Brillisour & Moline used to make looping pliers designed for light wire, but I'm afraid they're out of business. . NEWS FLASH: "Hook-Kon" brand looping pliers are available from Advance Car Mover! These are the same pliers mentioned above - I've got a pair and they work great for light wire extension springs! Simple loops:
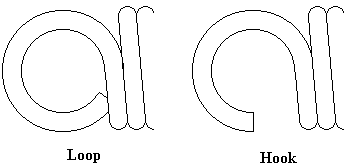
Now you've made one end of the spring. The next thing to do is to figure out how much you have to cut off the other end to make the whole thing the length you want it to be. If it's a matter of being just a little short, you can always extend your hooks by straightening out the wire after if comes off the body of the spring. If it's a short spring and you're just making one from the coil you have, count the coils and add enough to make the loop - just shy of a full coil. If it's a short spring and you've wound a long coil, do the same thing and separate the first spring from the main body with wire cutters (or with your cutoff wheel, if you're working with heavier wire). You can cut the whole coil to about the right length, but remember, you have to add "just shy of a full coil" to each end of the spring to make it come out right. If it's a long spring (or you just don't want to bother counting coils), measure the body of the coil and then add about 1-3/4 coils. Once you've trimmed the body to size, go ahead and make the second loop, exactly the same way that you made the first. Then, doublecheck the length of the spring - usually, inside one hook to inside the other will give you the best check on this - and see if it's what you want. If it's too short, you have a couple of options. You can make the next spring with more coils in the body, or you can make the next spring with the fancier type of loop. Loops and HooksLoops will work best for most extension springs. Sometimes, though, you'll want hooks - like when you'll want to slip the spring onto a pin, for instance. Making hooks is very simple, once you've made loops: all you have to do is cut the end of the wire off so that it doesn't come all the way around to the body of the spring:
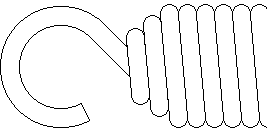
Swivel HooksExtension springs are sometimes made with hooks that swivel:
Doing this without kickpress tooling is abysmally difficult, so your best bet, if you have to have this type of spring, is to have it made commercially. Forward to Finishing. |