COMPRESSION SPRINGS
This page will tell you how to make compression springs. Making compression springs is a lot more
fun than making either extension or torsion springs, but it's also a lot more complicated.
Before we start, let's have a word about equipment. Compression springs have pitch - that's the distance between the open coils in the spring - and to make a spring with pitch means that you have to be able to control how fast your wire guide travels from left to right as the arbor turns around.
With a lathe, it's easy. You just engage the lead screw and away you go.
But with a drill or a hand winder, it's more difficult. Not impossible, just more difficult.
Spring shops get around the difficulty by buying a hand-winding machine designed for making light compression springs. These are designed so that once you set it up, you can make any number of springs and they will all be exactly the same.
Using a lathe, especially for light wire, you're likely to get a lot of different springs, even though you think you're doing the same thing each time you wind one. That's the difference between doing the job 'by eye' and having professional equipment.
Wire Length
The first thing to do is figure out how much wire you'll need to make a spring. To do this:
Take the outside diameter of the spring and multiply it by 3.3. Take the number of active coils and add 9. Multiply the results of steps 1 and 2 together. Add in a fudge factor. With light wire, make the fudge factor about 6"; with medium wire, about 36" with heavy wire, about 66". Write the result down. If you're WAY off, you can save yourself a lot of wire by cutting it closer. By writing down what you think you'll need, you'll know how much you can change this figure and still have a margin for safety.
Coiling the First Trial
BEFORE YOU START, set your lead screw to the right setting and make sure your back gear is engaged. Remember that the heavier the wire you're using, the slower your lathe speed should be. Here's how to set your lead screw speed:
First make sure that the lead screw will go in the right direction - left to right - when you engage it. The second step is to set the speed of the lead screw so that the coils will be properly spaced along the arbor. To do this, measure (or figure out by math, or guess) how far apart the coils should be.
The quick way to ballpark the pitch is:
Take the free length of the spring and subtract 1½ times the diameter of the wire. Divide the result by the number of active coils. Then turn on your lathe and engage the lead screw. Hold a piece of chalk tight against the tool post and move the post toward the arbor until the chalk just touches it. Let the chalk mark the arbor for a couple of turns, and then stop the lathe. Measure the distance between your chalk marks and compare it to what you want. Adjust the speed of your lead screw until they're about the same.
Once you've gotten your lead screw setting, you can go ahead and make your first trial spring:
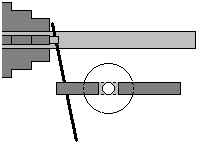
Cut a piece of wire to the length you figured out above. Be sure that anyone else in the area stays out of danger while you do the rest of this. Also, get your oven heated up. Put the wire into your setup and move your wire guide to the left, close enough to the pickup pin so that the wire catches on both.
Your setup should now look like this:
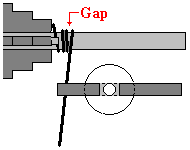
READ THE NEXT STEP ALL THE WAY THROUGH BEFORE YOU START IT. Start your coiling. Move the chuck DEAD SLOW until the wire has come around for one full coil. Lay down at least two full coils touching each other. The way you do this is to have your wire guide a little to the LEFT of where the wire lays down on the arbor, like this:
When you have these first coils laid down on the arbor, you'll then need to do two things at the same time.
First, engage your lead screw.
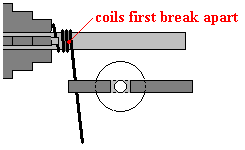
If you're winding wire over about .187", DO NOT reach over the wire to grab the lead screw control! Instead, reach UNDER the wire. That way, if the wire guide breaks, the wire won't take your arm off at the shoulder. Second, start counting your coils. Count "one" each time the point at which the active coils separate from the end coils passes the top of the chuck.
Looking at the setup from the top, this is the point you use to count:
Keep counting until you reach the number of active coils you want in the finished spring, and then let a couple more coils wind on, keeping your count going. Then disengage the lead screw. The wire will close up on itself and start to form closed coils. Let a couple of closed coils form on the arbor and then turn off the lathe. DON'T LET THE "BACK" END OF THE WIRE PASS THE PIN ON THE WIRE GUIDE! Write down your final coil count for reference. Reverse the chuck slowly so that the spring is loose on the arbor. Don't let the pickup pin or the jaws of the chuck catch the front end of the wire as the spring gets loose on the arbor!
If there's a lot of extra wire, cut it off. Then, put your spring into the oven and relieve the stress. For this trial, you can leave it in the oven for half an hour. Remember that stress relief will cause music wire springs to close up slightly, while stainless steel will expand.
When you've finished this process, let the spring air-cool and measure it to see how close you came to what you want. Check the diameter first. If it's not OK, don't bother going any further: you'll need a different arbor, which will change all the rest of your dimensions.
If the diameter is OK, count the number of active coils in your spring. You should be pretty close: for a small number of springs, being a quarter coil off either way is OK. If you're more than a quarter coil off, figure out how much more or less you need and change your coil count for the next trial.
Coiling without a lead screw
It's possible to coil compression springs without a lead screw on your lathe. The difficulty you'll run into is making more than one spring alike. Here's how you do it:
Calculate the pitch of the spring. Take the free length, subtract 1½ wire diameters, and divide the result by the number of active coils you want. Hold your chalk up against the tool post and move the tool post toward the arbor until the chalk leaves a mark an inch or two to the right of the chuck. Turn on the lathe, letting the chalk ride on the arbor, making a complete circle around the arbor. With the handwheel, move the tool post to the right at a steady pace, keeping the chalk in contact with the arbor. The chalk will mark a path approximating the spring you want to make. Count the number of coils you mark with the chalk and stop the rightward motion of the tool post when you reach your trial coil count. Let the lathe continue to run until the chalk has marked the arbor all the way around. Wind a trial spring, making the wire follow your chalk line as closely as possible. If your spring is not right, wash the chalk off the arbor, recalculate the pitch as needed, and try again.
Finishing the Ends
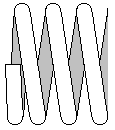 The next step is to cut off the excess coils from both ends. Find the point where the active coils first close up and cut off anything past that point. Each end of your spring should look like this when you're done: The next step is to cut off the excess coils from both ends. Find the point where the active coils first close up and cut off anything past that point. Each end of your spring should look like this when you're done:
This type of end is called a "closed end". For a lot of applications, you can leave your springs exactly like this: if this is the case with your spring, you can skip down to "Free Length". If your spring has to be ground square, read on.
Grinding
BEFORE YOU START, PUT ON A PAIR OF GLOVES. There's nothing quite so much fun as accidentally touching your hand to a moving grinding wheel! Then, make sure that there's nothing flammable nearby: grinding will give off sparks!
Take your spring over to your grinding wheel and grind it square. Some tips:
Hold the spring lightly, so that if it catches on the grinding wheel it won't drag your hand along with it. A standard bench grinder will work for light wire, but whatever size grinder you're using, grind on the side of the wheel - not the front. Start grinding with the free end up, rotating the spring about 1/8 of a turn every so often. Keep the spring square with the grinding wheel. With light wire, it's easy. Heavy wire takes some practice. Spring shops have jigs that they use for keeping the springs square while grinding. Move the spring from side to side across the surface of the grinding wheel (which prevents the spring from digging a groove in it). Keep the body of the spring perpendicular to the flat side of the wheel, and don't forget to dress the wheel from time to time, especially if you're grinding stainless steel or other softer material. Every few seconds, dip the end of the spring into some water to keep it cool. If it starts to glow red, it's WAY too hot. Stainless steel has to be kept cooler than other types of wire. When you've ground the top surface, start to rotate the spring so that the grinding wheel ends up hitting 3/4 of the first coil. Grind until the tip of the first coil is about 3/4 ground away. If you've kept the spring square to your wheel, that'll give you a good grind.
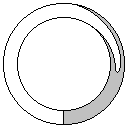
If you're looking at the end of the spring, the ground surface should look like this:
The other thing to check is how square your ground ends are. You can do this by setting your spring down next to a carpenter's square, a machinist's square, a book, or anything else that stands up straight. Then, holding the bottom end of the spring next to your square, turn the spring around and watch the gap between the square and the top end.
If your spring is perfectly square, there will be no gap as you turn the spring around. A small gap is OK, since the ends of the spring will flatten out under load. If there's a big gap, then you need to grind the end some more. (Commercial squareness in spring shops is +/-3 degrees.)
When you're finished grinding the end surfaces, use a file or a pointed grinding stone to get rid of any burrs on both the outside and the inside of the ends.
Free Length
Once you've ground your ends, measure the length of the spring from end to end ("free length"). If it's not what you want, you may have to adjust your lead screw speed. Here's how to tell what adjustments to make:
If the number of active coils is right but the spring is too short, keep the coil count the same and increase the speed of the lead screw. If the number of active coils is right but the spring is too long, keep the coil count the same and decrease the speed of the lead screw. If the number of active coils is too low and the spring is too short, increase your coil count. If the number of active coils is too low and the spring is too long, increase your coil countand decrease the speed of your lead screw. If the number of active coils is too high and the spring is too short, decrease your coil count and increase the speed of your lead screw. If the number of active coils is too high and the spring is too long, decrease your coil count.
One last thing. If your spring is good except that it's just a little long, you may be able to shorten it without any more grinding. There are two ways to do this:
Setting solid:
Take the spring and put enough load on it to make all the open coils touch each other all the way around. This is called setting the spring solid, and it might shorten your spring up a little bit.
Remember that when you put a load on a compression spring, it'll want to spring back to its free length. If you hold it unevenly, it might fly out sideways. Best bet, if you're going to set your springs solid, is to mount your arbor in a vise, slip your spring(s) onto the arbor, and set them solid using a piece of flat steel, drilled to accommodate the arbor. This will prevent your springs from flying away and hurting someone.
Heat setting:
Heat setting your springs will make them shorter than setting them solid will. You MUST heat set springs that will be used somewhere hot - like inside an engine, for instance. Here's how to do it:
Find a rod that's longer than your spring and just a little bit narrower than the inside diameter of the spring. The arbor you used to coil the spring should work nicely. Grind a flat spot near one end and make two collet clamps. Mount one so that the set screw fits into the flat spot on the rod. Slide your spring onto the rod up against the collet clamp and slide the other collet clamp on after it. Set the spring solid ON THE BAR, using a vise as in "setting solid" above, and tighten the set screw on the second collet clamp so that it holds the spring in that position.
AFTER THIS POINT, BE VERY CAREFUL NOT TO POINT EITHER END OF THE ROD AT ANYONE, INCLUDING YOURSELF! Stick the rod, with the spring and collet clamps, into your oven. The longer you let it cook, or the higher the temperature, the shorter the spring will get. Take the rod out of the oven and let it air-cool. MAKING SURE THAT THE ENDS OF THE ROD POINT AWAY FROM YOU, loosen the second collet clamp. If you're working with heavy wire, mount the "tail" end of the rod in a vise, so that when the collet clamp breaks loose, it won't go anywhere.
The spring will bounce back to near its free length, and you can check it against what you want.
Forward to Finishing your springs.
Terms of Use
|
